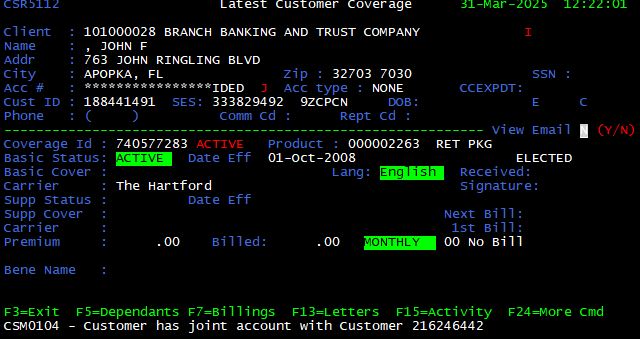
Function Keys Specific to the Latest Customer Coverage Screen
| Key | Name | Function |
| F3 | Exit | Exits the current screen; Escape and returns to the previous level |
| F6 | Premium Due Notice | Displays PDN information and history |
| F7 | Billing | Displays billing information and history |
| F8 | Fulfillment History | Displays the status of fulfillment and previous carriers |
| F9 | Comments | Displays comments made to the coverage record |
| F10 | Cancel Duplicate Certificate Request | Cancels the previous request for duplicate certificate |
| F11 | Refunds | Displays refund information and history |
| F12 | Duplicate Certificate Request | Queues a request for re-fulfillment |
| F13 | Letters | Displays letters available to send to the customer |
| F15 | Activity | Displays actions performed on the customer record |
| F16 | Flash | Displays client flash information applicable to the specific coverage |
| F18 | Workflow Request | Displays workflow request form to send messages to Customer Relations/Claims |
| F19 | Display Product | Displays detailed product information to include SES and Spoken Key applicable to the insured’s coverage |
| F20 | Restore Non-Contributory | Restores Non-contributory coverage, if canceled |
| F21 | Display Related Customer | Displays joint account holder information |
| F22 | Display Enrollment Method | Displays the enrollment method |
| F23 | Suppress Mail | Removes customer’s name and address from future phone and/or mail solicitations. |
| F24 | Display More Commands | Cycles through function key guide at the bottom of the window |
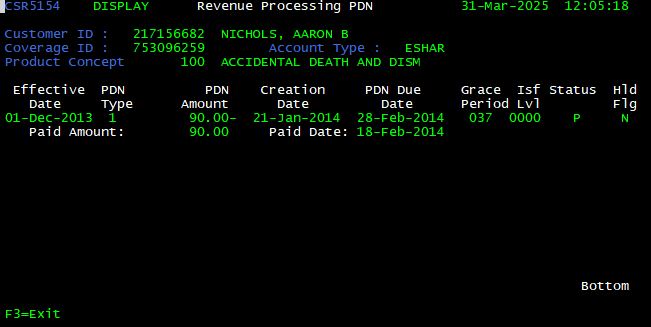
Premium Due Notice (PDN) Information <F6>
In order to display information regarding a Premium Due Notice, press <F6> from the Latest Customer Coverage screen. The Revenue Processing PDN screen is displayed. This screen shows detailed information about the courtesy reminder (PDN) Franklin Madison sends customers when premiums are not collected.
| PDN Field | Function |
| Effective Date | Displays the billing date on which premiums were not collected |
| PDN Type | Displays the version of PDN sent (1, 2 or 3) |
| PDN Amount | Displays the premium amount due |
| Creation Date | Displays the date on which the PDN was generated/mailed; drives the PDN Due date |
| PDN Due Date | Displays the date on which the premiums are due, equal to the Creation Date plus the grace period |
| Grace Period | Displays the length (in days) of the grace period (045) |
| Isf Lvl | (not utilized in the contact center) |
| Status | (not utilized in the contact center) |
| Hld Flag | Displays “H” if the PDN is on hold from mailing. This occurs occasionally when billing changes are made to a select group of customers. |
Billing <F7>
In order to display information regarding Billing, press <F7> from the Latest Customer Coverage screen. The Display Customer Billings screen is displayed.
| Billing Field | Function |
| Effective Billing Date | Displays the date on which billing data is transferred to the Billing Processor |
| Amount Billed | Displays the premium amount billed |
| Amount Collected | Displays the premium amount collected |
| Collection Status | Displays the status of collection… |
| BILLED: Premiums may have been collected | |
| REBILLED: Premiums were not collected; will bill again | |
| REFUNDED: Premiums have been refunded | |
| Posting Date | Displays the actual date on which the account is/will be billed |
| Comment | Displays information on premiums (waived/pending/refunds) |
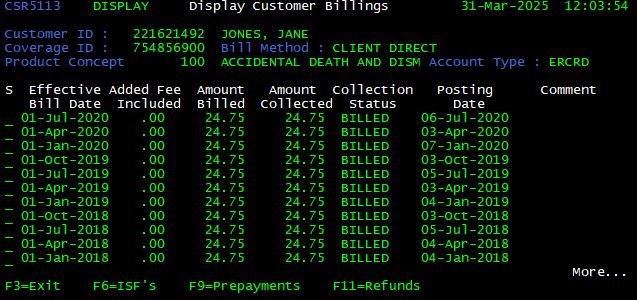
From the Display Customer Billings screen, there are three (3) options which can be applied to a billing record:
| Option | Description |
| <F6> | ISF’s |
| <F9> | Prepayments |
| <F11> | Refunds |
| <X> | Display Billing Details |
ISF (Insufficient Funds) <F6>
From the Display Customer Billings screen, press <F6> to view information regarding insufficient funds rejects. The Revenue Processing PDN screen is displayed.
A Pre-note is essentially a “test” of the account to ensure that Franklin Madison has the correct account information for future deductions. The billing amount will be listed as $0.00.
Prepayments <F9>
From the Display Customer Billings screen, press <F9> to view prepayment billing information. The Display Customer Prepayments screen is displayed.
Be sure to check the prepayment “bucket” (balance) if the customer inquires about payments that have been submitted but not applied.| Prepayment Field | Function |
| Effective Date | Displays the date on which billing data is transferred to the Billing Processor |
| Remittance Amount | Displays the amount of premium submitted in excess of the premium billed. |
| Remittance Balance | Displays the balance of all premiums submitted in excess of the premium billed. |
| Return Amount | Displays the amount (if any) returned to the customer |
| Due Date | Displays the premium due date to which the prepayment is applied. |
| Create Date | Displays the date on which the prepayment entry was created |
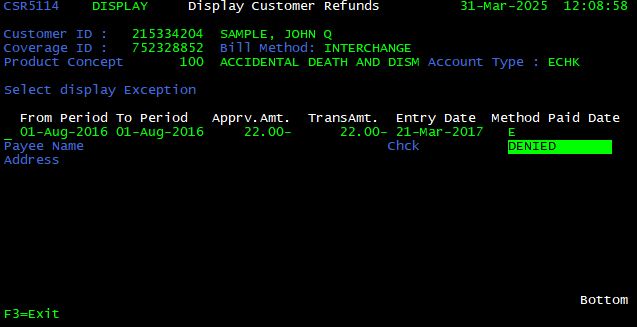
Refunds <F11>
From the Display Customer Billings screen, press <F11> to view information regarding refunds. The Display Customer Refunds screen is shown. From here, the user can determine the refund method, customer who was refunded and refund amount.
| Refund Field | Function |
| Period to Period | Displays the date range of the coverage period refunded |
| Amount | Displays the premium amount refunded |
| Entry Date | Displays the date on which the refund was requested |
| Method | Displays the refund method… |
| C: Check (Paper or Manual) | |
| E: Electronic | |
| Paid Date | Displays the date on which the refund was paid |
| Status | Displays the status of collection… |
| REQUESTED: Pending approval from Customer Relations | |
| APPROVED: Pending approval from Accounting | |
| WAITING: Refund will be paid on the next refund date | |
| DENIED: Refund denied; will not be granted | |
| PAID: Refund processed/mailed |
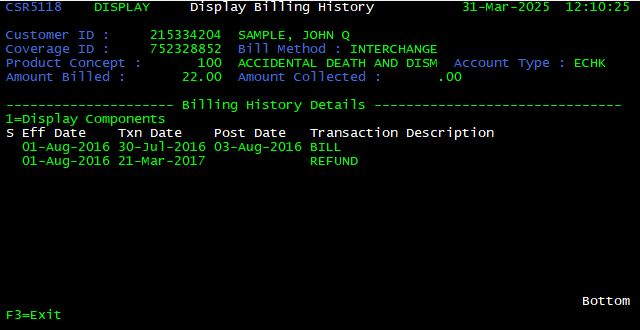
Display Billing History <X>
From the Display Customer Billings screen, enter any key in the box to the left of the billing record to view detailed billing information. The Display Billing History screen is shown. From here, the user can determine if the billing was collected, rejected or has been paid (mailed in premium). Note: The billing reject reason should never be provided to a caller.
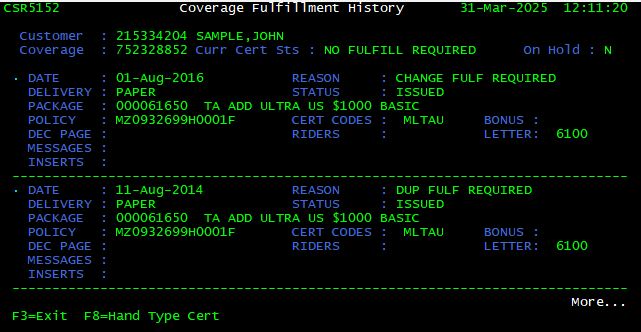
Fulfillment History <F8>
In order to display information regarding fulfillment, press <F8> from the Latest Customer Coverage screen. The Coverage Fulfillment History screen is displayed. This screen also displays any previous carriers.
From the Coverage Fulfillment History screen, there is one (1) option which can be applied:
| Option | Description |
| <F8> | Request Hand-typed Certificate |
| (not utilized by Contact Center) |
Hand Typed Certificate <F8>
From the Coverage Fulfillment History screen, press <F8> again to request a hand-typed certificate.
Comments <F9>
In order to view and/or add comments to a customer record, press <F9> from the Latest Customer Coverage screen. The Letters / Comments screen is displayed. This screen also contains information about certificate and fulfillment hold status.
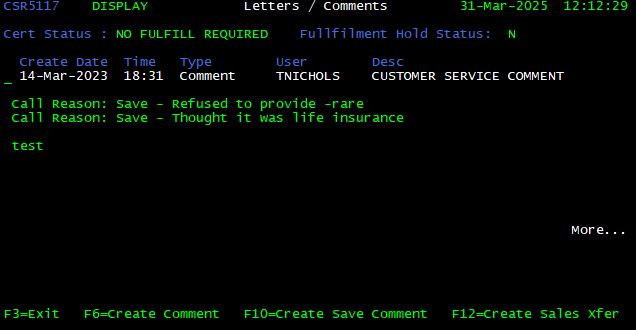
Create Comment <F6>
From the Comments screen, press <F6> to add a new comment to the customer record. A blank entry field is displayed with several lines to enter text.
It is important to enter the material and substantial points of the call in a clear, concise manner. The history of comments paints a chronological picture of actions, requests for a given customer record. Each comment entry is time/date stamped. Comments cannot be edited. Shorthand is acceptable, with the understanding that standard abbreviations are used.
Letters that have been mailed (or requested) also appear on the Comments screen. It is not necessary to create a new comment if a letter is being requested. When a letter is requested, a comment is automatically populated. The same rules apply to commenting a letter.
Comments should never include emotion, opinion, or profanity (even if directly quoted). Always stick to the facts!
- The caller or relationship should be identified as ‘PI’ (Primary Insured), ‘SP’ (Spouse), ‘FI’ (Financial Institution) or other.
- Then, the reason for call and/or action taken on the call is noted. For example: ‘cld to vfy cvg’ = ‘called to verify coverage’
- Comments are always closed with the user’s first initial and last name. For example ‘RNixon’ = Randy Nixon
- Be sure to use the appropriate Call Reason Code
There should only be one comment per call. Do not add another comment because of a typo, an incomplete comment, etc. One comment per call!
Sample comments:
PI cld to vfy cov jbrown
(Primary Insured called to verify coverage)
SP cld to req clm frm txfr to clms jbrown
(Spouse called to request claim forms – transferred to Claims)
PI cld req dup cert jbrown
(Primary Insured called. Duplicate certificate Requested)
Certificate and Fulfillment Hold Status
In the top, left-hand corner of the Comments / Letter screen, the Cert Status is displayed. In the top right-hand corner, the Fulfillment Hold Status is displayed. Possible values for these fields are as follows:
| Cert Status | Description |
| NO FULFILL REQUIRED | All fulfillment requests have been processed |
| DUP CERT REQUIRED | A duplicate certificate has been requested |
| DUP CERT PENDING | A duplicate certificate request has been forwarded for fulfillment |
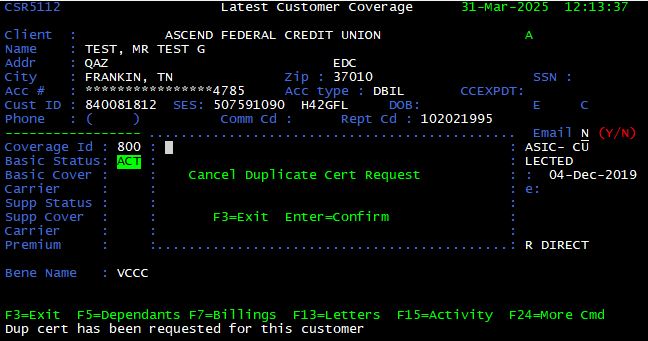
Cancel Duplicate Certificate Request <F10>
From the Latest Customer Coverage screen, press <F10> to cancel a duplicate certificate request. A confirmation prompt is displayed. Press <Enter> to accept or <F3> to exit.
Duplicate Certificate Request <F12>
From the Latest Customer Coverage screen, press <F12> to request a duplicate certificate for the customer. A confirmation prompt is displayed. Press <Enter> to accept or <F3> to exit.

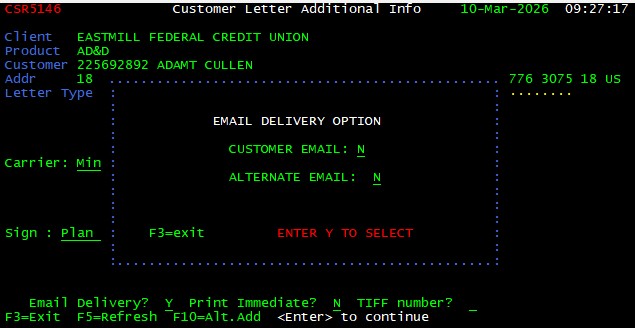
Letters <F13>
From the Latest Customer Coverage screen, press <F13> (<Shift> + <F1>) to display a list of letters available to send for the customer record. The Select Letter screen is displayed.
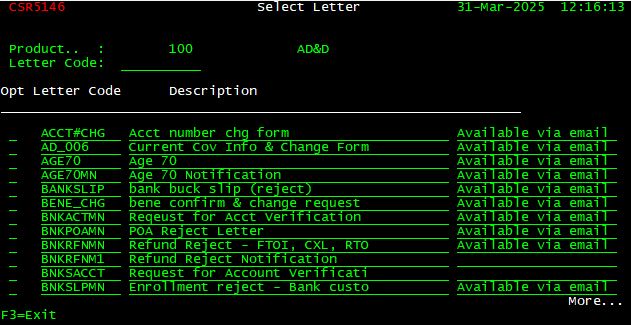
It is important to note that some letters are just that, a letter to the customer. Other letters perform an action on the customer record with some generating a letter to the customer and others just preforming the action.
If more than one cancellation letter (CXL) is requested for the same coverage record in the same business day, the actions cancel each other out and the coverage will remain active.Alternate Address
Some letters can be sent to an alternate address if the customer requests. In order to enter an alternate address, press <F10> after the appropriate letter is displayed. All letters sent to an alternate address, MUST be addressed to the insured and to the attention of an alternate name/address. The primary insured’s first and last name are required in the First and Last Name fields. The address, city, state, and zip fields are to be used to enter the alternate name and address.

Alternate Email Address
Some letters can be sent to an alternate email address if the customer requests by entering a “Y” next to the alternate email field. The alternate email address is NOT stored in Artemis. An appropriate use of the alternate email address is in cases where receiving the letter is urgent or time sensitive (i.e., No Cash Value letter for a landlord or Medicare).
Activity <F15>
The Activity screen provides a history of any changes that have been made on an insured’s account. Functionality allows the user request written change requests to be retrieved, and then sent to the customer (I.e. Proof of enrollment). The change descriptions listed on this screen can be somewhat puzzling. A reference table is included in this section to help define change descriptions.
From the Latest Customer Coverage screen, press <F15> (<Shift> + <F3>). The Display Customer Change Activity screen is displayed. You can also press <F13> (<Shift> + <F1>) to update a customer’s address and phone number.
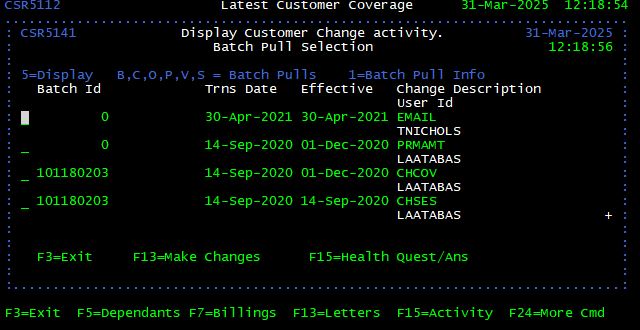
| Activity Field | Description |
| Batch ID | Unique identifier for a physical piece of documentation added to a coverage record |
| 0 – Online modification (no batch available) | |
| 99 – Manual modification (batch possibly available) | |
| 123456789 – Physical documentation (batch available) | |
| Trns Date | The date on which a change was processed |
| Effective | The date on which a requested change is effective |
| Change Description | Code for the type of change processed |
Change Description Explanations:
| Activity Code | Description |
| ACCTYPE | ACCOUNT TYPE CHANGE |
| ADD | NEW ENROLLMENT |
| ADDCVG | ADD COVERAGE TO EXISTING CUSTOMER |
| APPDWNG | APP DOWNGRADE |
| APPUPG | APP UPGRADE |
| ASSGN | CHANGE COVERAGE ASSIGNEE |
| CANCL | CANCEL COVERAGE |
| BILLMETH | CHANGE TO BILLING SET OR BILLING ORGANIZATION ID |
| BILLORG | CHANGE TO BILLING ORGANIZATION ID |
| CARRCONV | CARRIER CONVERSION |
| CHACC | CHANGED ACCT NUMBER |
| CHCOV | CHANGE COVERAGE LEVEL |
| CHADR | CHANGED ADDRESS |
| CHGDOB | CHANGE TO BIRTHDATE |
| CHGEFF | CHANGE TO EFFECTIVE DATE |
| CHNAME | CHANGE TO PI NAME |
| CHSEG | CHANGE TO COVERAGE SEGMENT (SES) |
| CHBENE | CHANGE OF BENEFICIARY |
| CHTR# | CHANGE OF TRANSIT ROUTING NUMBER |
| CLIENT | CHANGE FROM ONE CLIENT TO ANOTER |
| CNBAS | CANCELED THE BASIC COVERAGE |
| COVTYP | CHANGE TO COVERAGE TYPE |
| DOC | DOCUMENTATION ENTRY |
| DOCUMENT | ENROLLMENT DCMENTATION (pulled from Legacy system) |
| FTOI | CHANGED COVERAGE FROM FAMILY TO INDIVIDUAL |
| GROUP | GROUP CHANGE |
| MULTI (B, F, E, P) | MULTIPLE CHANGES |
| PRMAMT | CHANGE TO PREMIUM AMOUNT |
| RBASC | BASIC COVERAGE <F20> RESTORED |
| RDBAS | COVERAGE REDUCED TO BASIC ONLY |
| READD | COVERAGE ADDED TO PREVIOUS CUSTOMER |
| REINS | COVERAGE REINSTATED |
| RSTRSUP | SUPPLEMENTAL COMPONENT RESTORED |
| RSTRBAS | BASIC COMPONENT RESTORED |
| RSUPC | SUPPLEMENTAL COVERAGE REINSTATED (FROM CXL) |
| SESCHG | SES ID CHANGED |
| ACTIVITY CODE | DESCRIPTION |
| RTOB | REDUCE TO BASIC |
| TAKOV | TAKEOVER |
| TELE | TELEPHONE NUMBER CHANGED |
| TRNUM | TRANSIT ROUTING NUMBER CHANGED |
| UPCOV | COVERAGE INCREASED |
| UBTOS | INCREASED COVERAGE FROM BASIC TO SUPPLEMENTAL |
From the Display Customer Change Activity screen there are only two options which the agent can select:
| Option | Description |
| B | Beneficiary batch pull |
| S | Signature batch pull |
From the Display Customer Change Activity screen, enter the appropriate batch type (B, or S) in the box to the left of the Batch ID to request a particular batch to be sent to the customer. Press <Enter> to process the batch pull request.
When requesting a batch pull, always scan the list of Batch IDs and select the most recent batch that applies to the change. When verifying coverage amount, select the supplemental batch instead of the basic.Display Batch ID <5>
From the Display Customer Change Activity screen, enter <5> in the box to the left of a given Batch ID to display the batch details. The Customer Change History Detail screen is displayed.
The batch details are displayed in two sections: “Before” and “After”. The sections correspond to customer information as it existed before and after a change was processed respectively.
Make Changes <F13>
From the Display Customer Change Activity screen, press <F13> in to change customer information (name, address or phone). The Customer Change History Detail screen is displayed.
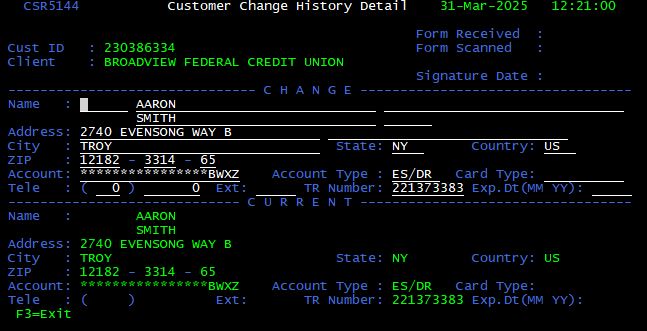
Enter the necessary updates to the customer’s information and press <Enter> to process and apply changes. It is important to note that the user must press <Enter> or changes will not be saved.
Flash <F16>
A Flash contains important information regarding the client that the agent would need to know. The agent should read the Flash anytime one is included in the coverage record. A Flash is available when the client id appears in red flashing numbers on the Latest Customer Coverage screen To display the flash press <F18> (<Shift> + <F4>).
Restore Non-Contributory Coverage <F20>
From the Latest Customer Coverage screen, press <F20> (<Shift> + <F8>) to restore Non-Contributory coverage (within 60 days of cancelation) for a given coverage record. Before doing so, verify with the customer that his/her account is open and active. In addition, verify that the financial institution still participates in the program requested.
Note: If the customer requests to add Supplemental coverage, an AD_006 letter must be sent.
Display Related Customer <F21>
From the Latest Customer Coverage screen, press <F21> (<Shift> + <F9>) to display the joint account coverage record if a red “J” appears to the right of the account number. This function is helpful in resolving issues where the wrong customer is billed.
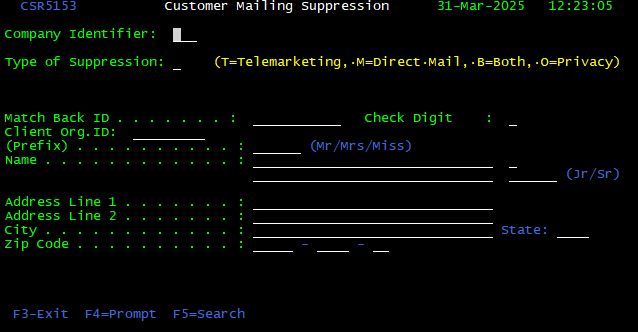
Suppress Mail <F23>
Customer is Currently Enrolled
From the Latest Customer Coverage screen, press <F23> (<Shift> + <F11>) to suppress (stop) future solicitations (mail, phone or both) for the coverage record. The Suppress Solicitation Mailings prompt is displayed. Enter the appropriate suppression code:
| Suppression Code | Description |
| M | Suppress future mail solicitations only |
| T | Suppress future phone solicitations only |
| B | Suppress both future mail and phone solicitations |
For ‘M’ type solicitation suppression within a coverage record, there is no need to enter an address. The address currently on file will be suppressed.
For ‘T’ and ‘B’ type solicitation suppression’s, the user must enter the phone number to be suppressed, even if a phone number is listed for the coverage record.
Press <Enter> to confirm suppression and a message will be displayed.
Caller is Not Enrolled
To suppress solicitation of a customer who has not enrolled, you would press the <F23> key from the Customer Inquiry Screen. You would have the same M, T, and B choices but you would also need to complete the customer’s information.
More Commands <F24>
From the Latest Customer Coverage screen, press <F24> (<Shift> + <F12>) to cycle through the applicable function key help guides at the bottom of the screen.